
接口自动化框架实战
接口自动化框架实战
前言
本文通过一个真实项目 GqAppJkAuto 讲解如何从零搭建一个接口自动化测试框架。GqAppJkAuto 基于 HttpRunner 4.x 构建,用于测试广汽传祺车载应用(gacmotor_app)的各类功能接口,技术栈为 Python + HttpRunner + pytest + Allure。
文章按「先看整体、再拆数据、最后深入依赖」的顺序展开:
- 应用架构:框架的分层与目录结构,建立整体认知;
- 测试数据:Yaml / Excel 两种数据驱动方式,把用例与数据解耦;
- 框架依赖:requests(HTTP 请求)、PyYaml(配置)、logging(日志)、pytest(用例组织与运行)四大基础模块的封装。
读完你将理解这个框架怎么分层、测试数据怎么组织、基础模块怎么封装,并能照此搭出一个同类接口自动化框架。
1. 应用架构
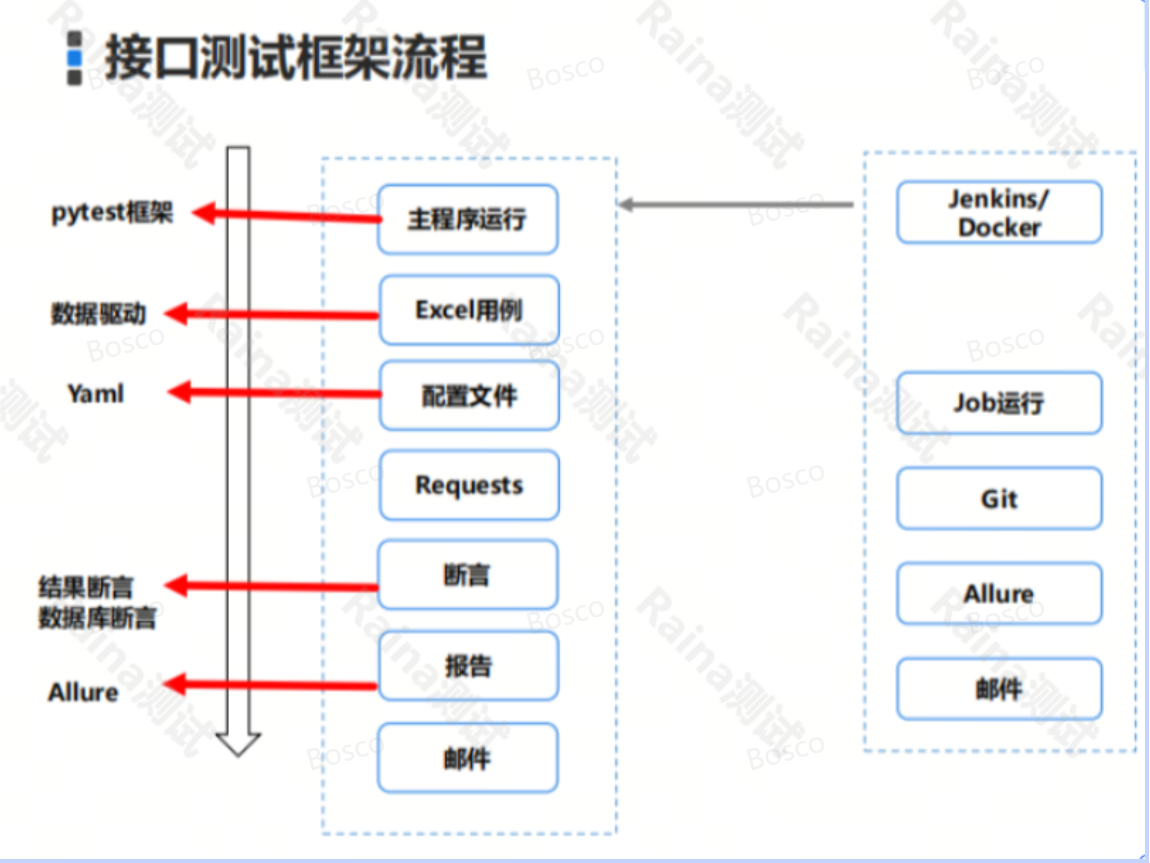
1.1 目录结构
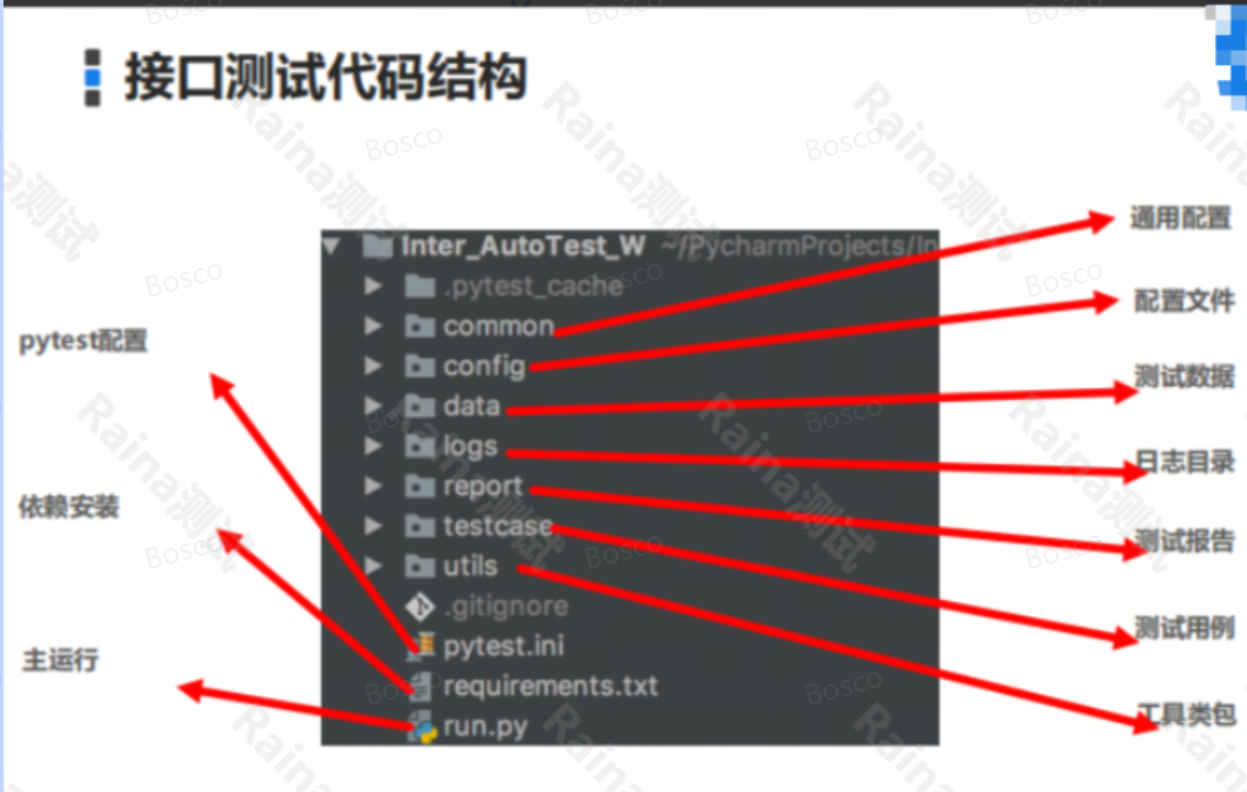
1.2 项目及依赖库
GqAppJkAuto 是一个基于 HttpRunner 4.x 构建的gacmotor_app自动化测试框架,专门用于测试广汽传祺车载应用的各类功能接口。项目采用 Python + HttpRunner + pytest + Allure 的技术栈,实现了对gacmotor_app功能的全面自动化测试。
1.3 技术栈
- 测试框架: HttpRunner v4.3.5
- 测试运行器: pytest
- 报告生成: Allure
- 编程语言: Python 3.8+
- 定时任务: APScheduler
- 邮件通知: SMTP
- 配置器: yaml
2. 测试数据
2.1 Yaml 数据驱动
HttpRunner 天然支持用 Yaml 描述测试用例,测试数据与测试逻辑分离,改数据不用改代码。一个典型的 HttpRunner 4.x 用例长这样:
config:
    name: 查询未读消息数量
    variables:
        project_id: "100001100001"

teststeps:
  - name: 查询未读消息数量
    request:
        method: GET
        url: /front/notification/un-read/$project_id
    validate:
- eq: ["status_code", 200]config:用例级配置,可放公共变量、base_url、断言等。teststeps:测试步骤列表,每个步骤用request描述请求、用validate做断言。$project_id:引用config.variables里定义的变量。
2.2 Excel 数据驱动
当测试数据量大、且习惯用 Excel 维护用例时,可以用 pandas / openpyxl 读取 Excel 作为数据源。
Excel 数据读取
用 pandas 读 Excel 最简洁:
import pandas as pd

df = pd.read_excel("cases.xlsx", sheet_name="未读消息", dtype=str)
cases = df.to_dict(orient="records")
print(cases[0])  # {'project_id': '100001100001', 'expect': '200'}
封装 Excel 工具类
把读取逻辑封装成工具类,统一处理路径、空值和类型转换:
from pathlib import Path

import pandas as pd


class ExcelUtils:
    """Excel 数据读取工具类。"""

    def __init__(self, excel_file, sheet_name=None):
        self.excel_file = Path(excel_file)
        self.sheet_name = sheet_name

    def read(self) -> list[dict]:
        df = pd.read_excel(self.excel_file, sheet_name=self.sheet_name, dtype=str)
        return df.fillna("").to_dict(orient="records")

    @staticmethod
    def read_by_sheet(excel_file, sheet_name):
        return ExcelUtils(excel_file, sheet_name).read()
数据驱动的核心是「一份代码 + 多份数据」:遍历
cases列表,把每一行数据喂给同一个用例执行。
3. 框架依赖
httprunner==4.1.6
pytest>=7.4.4
pytest-html
allure-pytest
requests
pandas
openpyxl
pycryptodome
beautifulsoup4
APScheduler
jinja2
loguru
funppy
pyyaml
dask[dataframe]
3.1 Request 模块
requests 是 Python 中最流行、最简洁易用的第三方 HTTP 请求库,专门用于发送 HTTP/HTTPS 请求,替代了 Python 内置的复杂 urllib 模块,让网络请求代码更简洁、易读。
requests 不是 Python 内置库,需要通过 pip 安装
3.1.1 常用方法及属性
response.status_code
response.content
response.headers
response.json()
#获取url
response.url
response.encoding
response.cookies
response.raw
#字符串方式的响应体
response.text
3.1.2 request 应用场景一:封装为 request_utils
import requests

def build_session():
    """创建并返回一个 requests 会话对象。"""
    return requests.Session()

class Request:
    """通用 HTTP 请求工具类。"""

    def __init__(self, session=None):
        """初始化请求工具。

        Args:
            session: 可选的 requests.Session 实例。
        """
        self.session = session or build_session()

    def requests_api(
        self,
        url,
        data=None,
        json=None,
        headers=None,
        cookies=None,
        method="get",
        params=None,
        files=None,
        auth=None,
        timeout=30,
        verify=True,
        allow_redirects=True,
        **kwargs,
    ):
        """发送任意 HTTP 方法请求并返回统一结构结果。

        Args:
            url: 请求地址。
            data: 表单数据。
            json: JSON 请求体。
            headers: 请求头。
            cookies: Cookie 信息。
            method: 请求方法,如 get/post/put/delete/patch/head/options。
            params: URL 查询参数。
            files: 上传文件。
            auth: 认证信息。
            timeout: 超时时间(秒)。
            verify: 是否校验证书。
            allow_redirects: 是否允许重定向。
            **kwargs: 透传给 requests 的其他参数。

        Returns:
            dict: 包含状态码、响应体、头信息、耗时等字段。
        """
        method = str(method).strip().lower()
        response = self.session.request(
            method=method,
            url=url,
            params=params,
            data=data,
            json=json,
            headers=headers,
            cookies=cookies,
            files=files,
            auth=auth,
            timeout=timeout,
            verify=verify,
            allow_redirects=allow_redirects,
            **kwargs,
        )
        code = response.status_code
        try:
            body = response.json()
        except Exception:
            body = response.text
        res = {
            "code": code,
            "body": body,
            "headers": dict(response.headers),
            "cookies": response.cookies.get_dict(),
            "url": response.url,
            "elapsed_ms": int(response.elapsed.total_seconds() * 1000),
            "ok": response.ok,
            "reason": response.reason,
            "raw": response,
        }
        return res

    def get(self, url, **kwargs):
        """发送 GET 请求。"""
        return self.requests_api(url, method="get", **kwargs)

    def post(self, url, **kwargs):
        """发送 POST 请求。"""
        return self.requests_api(url, method="post", **kwargs)

    def put(self, url, **kwargs):
        """发送 PUT 请求。"""
        return self.requests_api(url, method="put", **kwargs)

    def delete(self, url, **kwargs):
        """发送 DELETE 请求。"""
        return self.requests_api(url, method="delete", **kwargs)

    def patch(self, url, **kwargs):
        """发送 PATCH 请求。"""
        return self.requests_api(url, method="patch", **kwargs)

    def head(self, url, **kwargs):
        """发送 HEAD 请求。"""
        return self.requests_api(url, method="head", **kwargs)

    def options(self, url, **kwargs):
        """发送 OPTIONS 请求。"""
        return self.requests_api(url, method="options", **kwargs)
3.2 PyYaml 模块
3.2.1 Yaml 介绍
Yaml 文件是一种配置文件存储,类似Springboot 项目的启动信息,配置信息(数据库信息,redis信息,中间件信息,Logger信息等等)
3.2.2 PyYaml 应用场景一:封装 yaml_utils 工具包
from pathlib import Path

import yaml

class YamlUtils:
    """YAML 读取工具类。

    支持以下能力:
    1. 直接读取绝对路径或相对路径 YAML 文件。
    2. 当传入无后缀文件名时,自动在 configs 目录尝试 .yaml/.yml。
    3. 支持单文档与多文档 YAML 读取。
    """

    def __init__(self, yaml_file, configs_dir=None):
        """初始化 YAML 工具实例。

        Args:
            yaml_file: YAML 文件名或路径。
            configs_dir: 配置目录,默认使用项目根目录下 configs。

        Raises:
            FileNotFoundError: 当目标 YAML 文件不存在时抛出。
        """
        base_dir = Path(__file__).resolve().parent.parent
        self.configs_dir = Path(configs_dir) if configs_dir else base_dir / "configs"
        self.yaml_file = self._resolve_yaml_file(yaml_file)
        self.yamlFile = str(self.yaml_file)
        self._data = None
        self._data_all = None

    def _resolve_yaml_file(self, yaml_file):
        """解析 YAML 文件真实路径。"""
        candidate = Path(yaml_file)
        if candidate.is_file():
            return candidate

        if candidate.is_absolute():
            raise FileNotFoundError(f"yaml文件不存在:{yaml_file}")

        search_list = [self.configs_dir / candidate]
        if candidate.suffix.lower() not in {".yaml", ".yml"}:
            search_list.append(self.configs_dir / f"{candidate}.yaml")
            search_list.append(self.configs_dir / f"{candidate}.yml")

        for item in search_list:
            if item.is_file():
                return item

        raise FileNotFoundError(f"yaml文件不存在:{yaml_file}")

    def read_yaml(self):
        """读取单文档 YAML 并返回解析结果。"""
        if self._data is None:
            with self.yaml_file.open("r", encoding="utf-8") as f:
                self._data = yaml.safe_load(f)
        return self._data

    def read_all_yaml(self):
        """读取多文档 YAML 并返回文档列表。"""
        if self._data_all is None:
            with self.yaml_file.open("r", encoding="utf-8") as f:
                self._data_all = list(yaml.safe_load_all(f))
        return self._data_all
3.2.3 使用 yaml 文件加载 config 类
import os
from pathlib import Path

from utils.yaml_utils import YamlUtils

_BASE_DIR = Path(__file__).resolve().parent.parent
_CONFIG_PATH = _BASE_DIR / "configs"
_CONFIG_FILE = _CONFIG_PATH / "config.yml"
_LOG_PATH = _BASE_DIR / "logs"

def get_config_path():
    """返回配置目录路径。"""
    return str(_CONFIG_PATH)

def get_config_file():
    """返回基础配置文件 config.yml 路径。"""
    return str(_CONFIG_FILE)

def get_log_path():
    """返回日志目录路径。"""
    return str(_LOG_PATH)

def get_log_extension(default=".log"):
    """读取日志后缀,未配置时使用默认值。"""
    base_config = YamlUtils(get_config_file()).read_yaml() or {}
    return base_config.get("Base", {}).get("log_extension", default)

def _read_yaml_data(file_name):
    """读取 YAML 文件并返回字典数据。"""
    yaml_utils = YamlUtils(file_name, configs_dir=_CONFIG_PATH)
    return yaml_utils.read_yaml() or {}

def _extract_active_profile(config_data):
    """从不同配置结构中提取 active profile。"""
    if not isinstance(config_data, dict):
        return None
    profiles_data = config_data.get("profiles", {})
    if isinstance(profiles_data, dict):
        active = profiles_data.get("active") or profiles_data.get("activate")
        if active:
            return str(active).strip()
    spring_profiles = config_data.get("spring", {}).get("profiles", {})
    if isinstance(spring_profiles, dict):
        active = spring_profiles.get("active")
        if active:
            return str(active).strip()
    base_profiles = config_data.get("Base", {}).get("profiles", {})
    if isinstance(base_profiles, dict):
        active = base_profiles.get("active") or base_profiles.get("activate")
        if active:
            return str(active).strip()
    if isinstance(base_profiles, str) and base_profiles.strip():
        return base_profiles.strip()
    return None

def get_active_profile(profile=None):
    """获取当前生效 profile,优先级:参数 > 环境变量 > config.yml。"""
    if profile:
        return str(profile).strip()
    env_profile = os.getenv("APP_PROFILE") or os.getenv("ENV_PROFILE")
    if env_profile:
        return env_profile.strip()
    base_config = _read_yaml_data("config.yml")
    active_profile = _extract_active_profile(base_config)
    return active_profile or "uat"

def get_profile_config_file(profile=None):
    """根据 profile 返回环境配置文件路径。"""
    active_profile = get_active_profile(profile)
    config_yml = _CONFIG_PATH / f"application-{active_profile}.yml"
    config_yaml = _CONFIG_PATH / f"application-{active_profile}.yaml"
    if config_yml.is_file():
        return str(config_yml)
    if config_yaml.is_file():
        return str(config_yaml)
    return get_config_file()

class ConfigYaml:
    """配置读取入口,支持基础配置与环境配置。"""

    def __init__(self, profile=None, config_file=None):
        """初始化配置对象。"""
        self.base_config = _read_yaml_data("config.yml")
        self.profile = get_active_profile(profile)
        self.config_file = config_file or get_profile_config_file(self.profile)
        self.config = _read_yaml_data(self.config_file)

    def get_conf_uat_url(self):
        """返回 Base.uat.url 配置值。"""
        return self.base_config.get("Base", {}).get("uat", {}).get("url")

    def get_base_url(self):
        """返回 Base.<profile>.url 配置值。"""
        return self.base_config.get("Base", {}).get(self.profile, {}).get("url")

    def get_config(self):
        """返回当前环境配置内容。"""
        return self.config
3.3 logging 模块
3.3.1 logging 的使用和简介
logging 是python 内置的模块,主要用于输出运行日志,可以设置日志的等级,日志保存路径,日志文件回滚。
日志级别
- Not set
- Debug
- Info
- Warning
- Error
- Critical
子模块 - Loggers 程序直接调用的日志记录器
- Handlers 决定将日志记录分配到相关目录的处理器
- Filters 提供更细粒度的日志过滤器
- Formatters 日志格式化器
3.3.2 logging 封装工具类
import os
import time
import logging

from configs.config import get_log_extension, get_log_path

"""日志工具模块。"""
log_lever = {
    "info": logging.INFO,
    "debug": logging.DEBUG,
    "error": logging.ERROR,
    "warning": logging.WARNING,
    "critical": logging.CRITICAL,
}

def write_daily_log(log):
    """按天写入文本日志文件。"""
    time1 = time.strftime("%Y%m%d")
    log_dir = get_log_path()
    exists = os.path.exists(log_dir)
    if not exists:
        os.makedirs(log_dir)
    filename = os.path.join(log_dir, f"log{time1}.txt")
    with open(filename, "a", encoding="utf-8") as fp:
        fp.write(time.strftime("%Y-%m-%d %H:%M:%S") + "............." + log + "............." + "\n")

class Logger:
    """封装标准 logging,输出到控制台和文件。"""

    _default_logger = None

    def __init__(self, log_file=None, log_name="GqAppJkAuto", log_level="info"):
        """初始化日志实例并绑定 handler。"""
        if log_file is None:
            log_file = self._build_default_log_file()
        self.log_file = log_file
        self.log_name = log_name
        self.log_level = log_level
        self.logger = self._build_logger(self.log_file, self.log_name, self.log_level)

    @classmethod
    def _build_default_log_file(cls):
        '''创建默认的日志文件路径'''
        log_dir = get_log_path()
        if not os.path.exists(log_dir):
            os.makedirs(log_dir, exist_ok=True)
        time1 = time.strftime("%Y%m%d")
        extension = get_log_extension(".log")
        if not str(extension).startswith("."):
            extension = f".{extension}"
        return os.path.join(log_dir, f"log{time1}{extension}")

    @classmethod
    def _build_logger(cls, log_file, log_name, log_level):
        logger = logging.getLogger(log_name)
        logger.setLevel(log_lever[log_level])

        if not logger.handlers:
            fh_stream = logging.StreamHandler()
            fh_stream.setLevel(log_lever[log_level])
            log_formatter = logging.Formatter(
                "%(asctime)s - %(name)s - %(levelname)s - %(message)s"
            )
            fh_stream.setFormatter(log_formatter)
            fh_file = logging.FileHandler(log_file, encoding="utf-8")
            fh_file.setLevel(log_lever[log_level])
            fh_file.setFormatter(log_formatter)
            logger.addHandler(fh_stream)
            logger.addHandler(fh_file)
        return logger

    @classmethod
    def _get_default_logger(cls):
        if cls._default_logger is None:
            default_log_file = cls._build_default_log_file()
            cls._default_logger = cls._build_logger(
                default_log_file,
                "GqAppJkAuto",
                "info",
            )
        return cls._default_logger

    @classmethod
    def debug(cls, msg, *args, **kwargs):
        cls._get_default_logger().debug(msg, *args, **kwargs)

    @classmethod
    def info(cls, msg, *args, **kwargs):
        cls._get_default_logger().info(msg, *args, **kwargs)

    @classmethod
    def warning(cls, msg, *args, **kwargs):
        cls._get_default_logger().warning(msg, *args, **kwargs)

    @classmethod
    def error(cls, msg, *args, **kwargs):
        cls._get_default_logger().error(msg, *args, **kwargs)

    @classmethod
    def critical(cls, msg, *args, **kwargs):
        cls._get_default_logger().critical(msg, *args, **kwargs)
3.4 Pytest 模块
3.4.1 创建第一个测试用例
#使用jupyter 环境测试
def plus_one(x):
    return x + 1

sample = [1, 3, 5]
result = [plus_one(i) for i in sample]
expected = [2, 4, 6]

assert result == expected
print("Input:", sample)
print("Output:", result)
print("All checks passed")
3.4.2 pytest 基础使用
函数级别方法:setup_method / teardown_method
运行于测试方法的始末。有多个测试用例都需要相同的前置条件或后置条件时,可以在用例前定义 setup / teardown 方法(pytest 中对应
setup_method/teardown_method)。
class TestApi:
    def setup_method(self):
        print("每个测试方法执行前运行一次")

    def teardown_method(self):
        print("每个测试方法执行后运行一次")

    def test_query_unread(self):
        assert 1 == 1

    def test_query_car_info(self):
        assert 2 == 2
类级别方法:setup_class / teardown_class
运行于测试类的始末。一个测试类只运行一次 setup_class,常用于初始化连接、加载配置等开销较大的操作。
class TestApi:
    @classmethod
    def setup_class(cls):
        print("整个测试类开始前执行一次:初始化连接")

    @classmethod
    def teardown_class(cls):
        print("整个测试类结束后执行一次:释放连接")

    def test_one(self):
        assert True
说明:pytest 更推荐用 fixture 来做前置/后置处理,但老项目里 setup / teardown 的写法仍很常见,这里一并了解。